Groups
A group is a titled part of the graph. Collapsed, it is drawn as a single block that summarises what it holds; expanded, its objects are back in place inside a frame. Use groups when a graph gets too large to read: fold the victims, the drop wallets or a peel chain into one block each, and the shape of the case is visible again. Opening a group shows its contents alone, with the rest of the graph reduced to the parties it exchanged with.
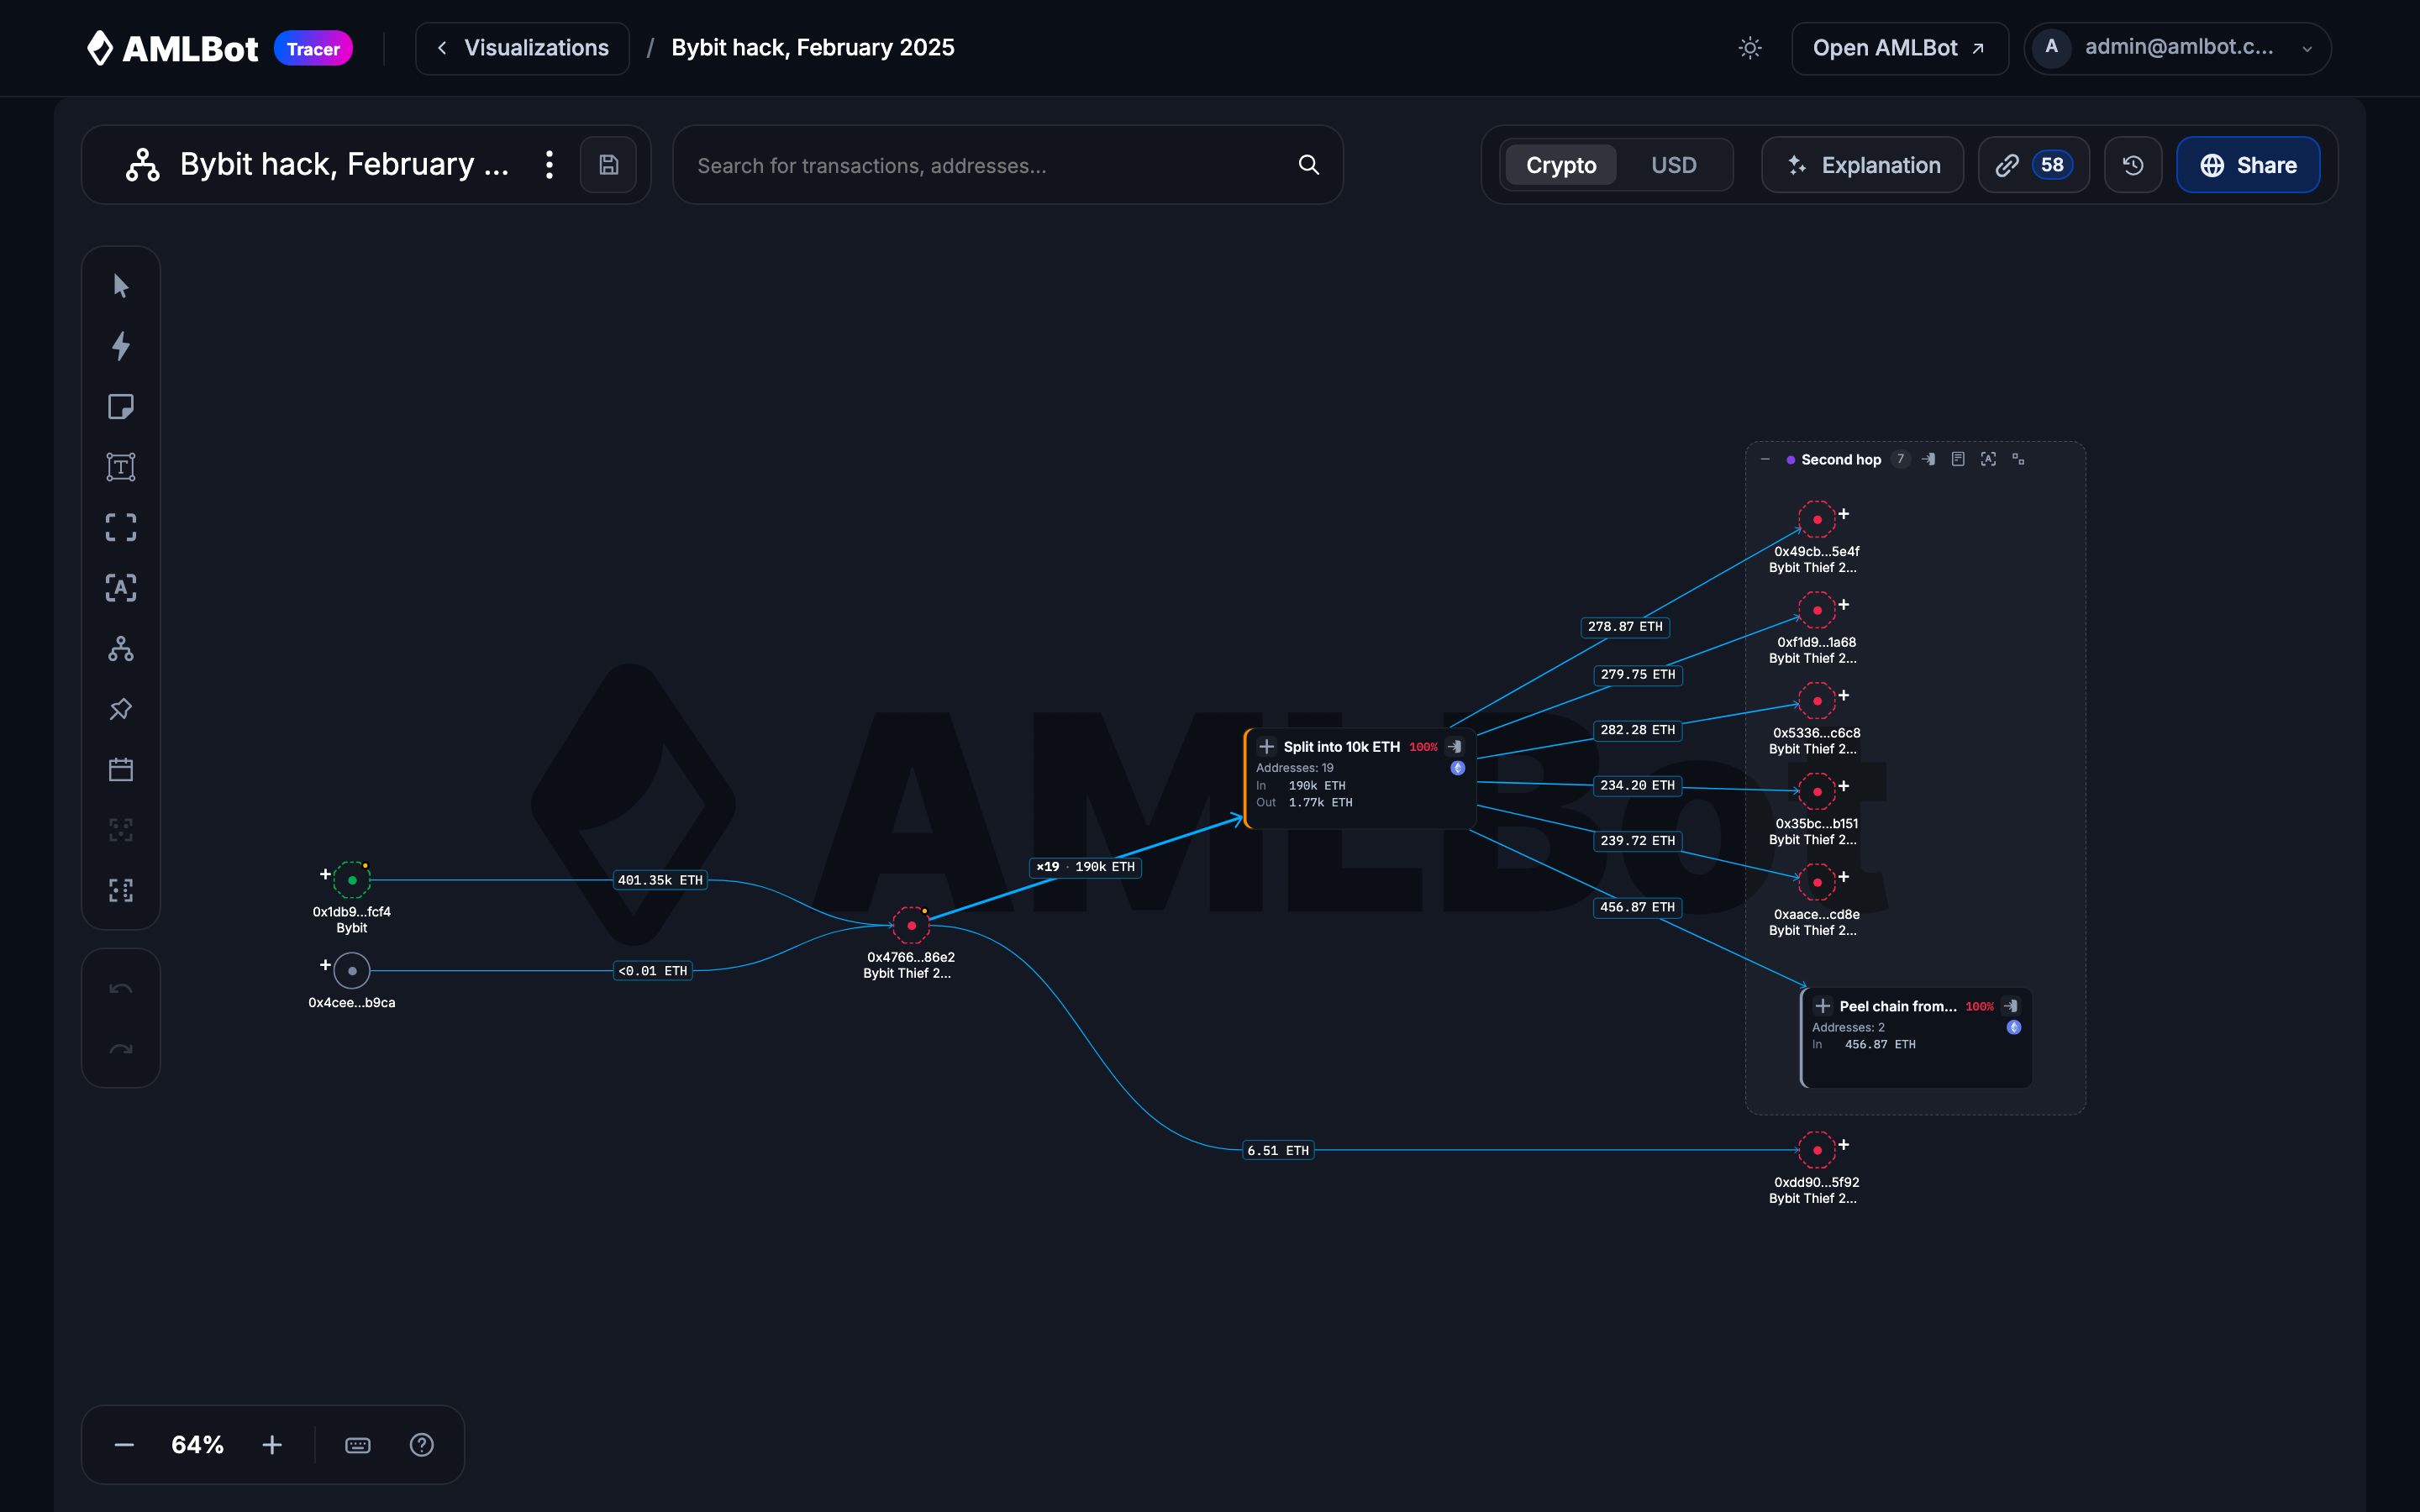
Groups are not custom clusters. A cluster claims that its addresses belong to one owner, and the graph treats them as that owner; a group only organises the picture and says nothing about ownership. A cluster can sit inside a group, and stays a cluster there.
Creating and ungrouping
Select the objects, then do one of:
- press ⌘G (Mac) or Ctrl+G;
- right-click the selection and choose Group;
- click Group the selection in the left tool strip.
Tracer asks for a title (New group, prefilled with Group 1, Group 2 and so on), and the group is created expanded, around the objects where they are.
Addresses, entities, clusters, comments, notes and other groups can be grouped. Transactions cannot be picked on their own: a transaction belongs to the group that holds the objects it connects, so it follows them. Everything selected has to come from the same level; the selection cannot mix objects inside a group with objects outside it.
To dissolve a group, use Ungroup in the right-click menu, on the frame header or in the group panel, or press ⌘⇧G / Ctrl+Shift+G with its block selected. The contents stay on the graph. Delete on a selected block does the same: it removes the group and keeps what it held.
Blocks and frames
Collapse on a frame’s header turns the group into a block; Expand on the block turns it back, with every object where it was.
A block summarises the group:
- its title, and a Start marker when the starting object of the graph is inside;
- Addresses and Entities: how many it holds;
- the chains it holds, as icons;
- the highest risk score of its addresses and entities;
- In and Out: the totals that cross its boundary, per asset (two assets, then
+N), or in US dollars with USD selected.
The transactions between a collapsed group and the rest of the graph are drawn as one line per
party and direction, labelled with their total and, when there is more than one, how many
transactions it holds (×8 · 2.96M USDT).
Click the line for the list behind it: every transaction with its Date, Tx hash,
From → to and Amount, an Open link for each, and the Total.
These lines follow the same display modes as the rest of the graph: Merged Txs Mode, the Crypto / USD toggle and Show Date.
Nesting
A group can hold other groups. Select a block together with other objects and group them, and the new group contains it; or drag a block into another group, or use Move to group… (below). To pick up an expanded group as a whole, collapse it first: its frame cannot be selected, only the objects in it. Grouping objects that are already inside a group makes a group within that one. Collapsing the outer group hides everything inside it, nested groups included.
Drilling in
Enter the group shows a group on its own: its contents, laid out as they are, and its outside counterparties as ports, inputs on the left and outputs on the right. Each port names the party, totals what its lines carry and, when that is more than one transaction, says how many. Click a port to go back out and see that party on the graph.
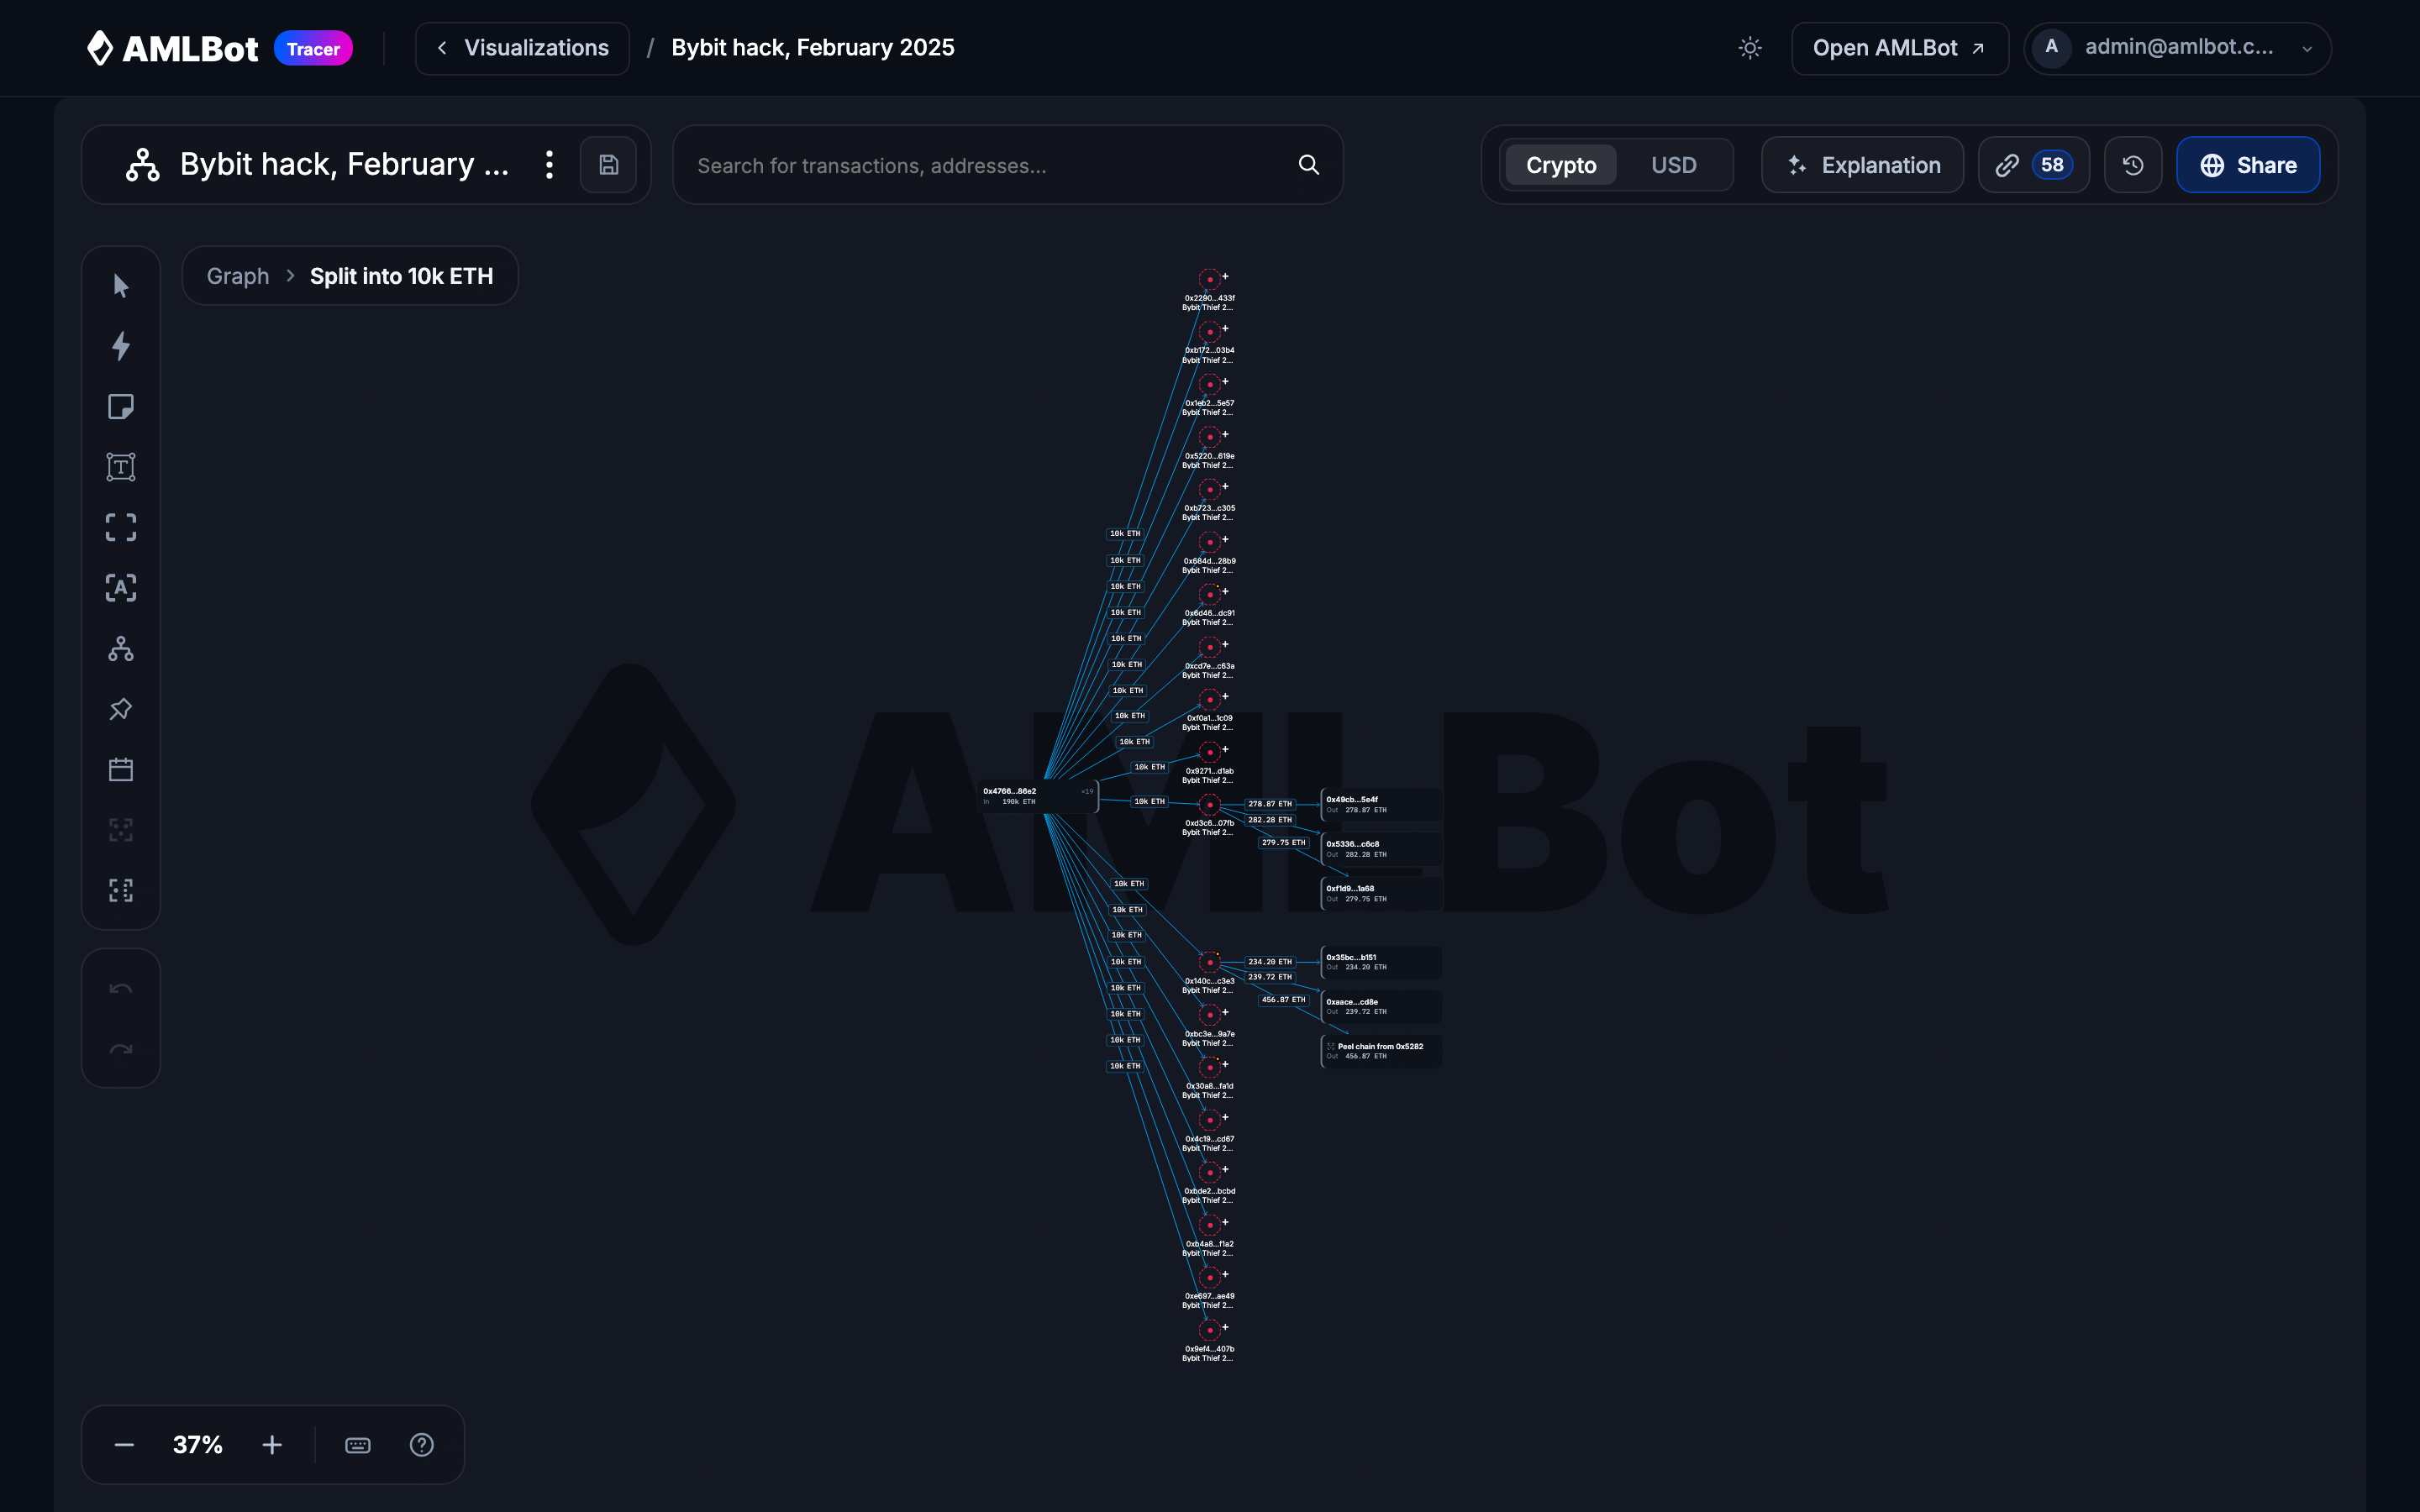
Ways in:
- the enter button on a block or on a frame’s header;
- a double-click on a block;
- Enter with one block selected;
- Enter the group in the group panel.
Ways out:
- the breadcrumbs under the title bar (Graph › outer group › inner group); click any level;
- Escape, one level up (after closing any open panel);
- a port.
On a phone the breadcrumbs shorten to ‹ Back and the title of the group you are in.
Each level keeps its own view while you work: leave a group and come back, and it is where you left it.
Objects you add inside a group join it. A search result, a transaction added from the address view, a comment, a note, a batch add and Path builder’s results all land in the group on screen.
Search finds objects wherever they are. A result inside a collapsed group or on another level is shown on the level that draws it, and a transaction folded into a group’s line is shown as that line, selected. The links in the Explanation and Show on graph in Findings work the same way.
Managing groups
The group panel
Click a block, click the title on a frame’s header, or right-click one selected block and choose Details.
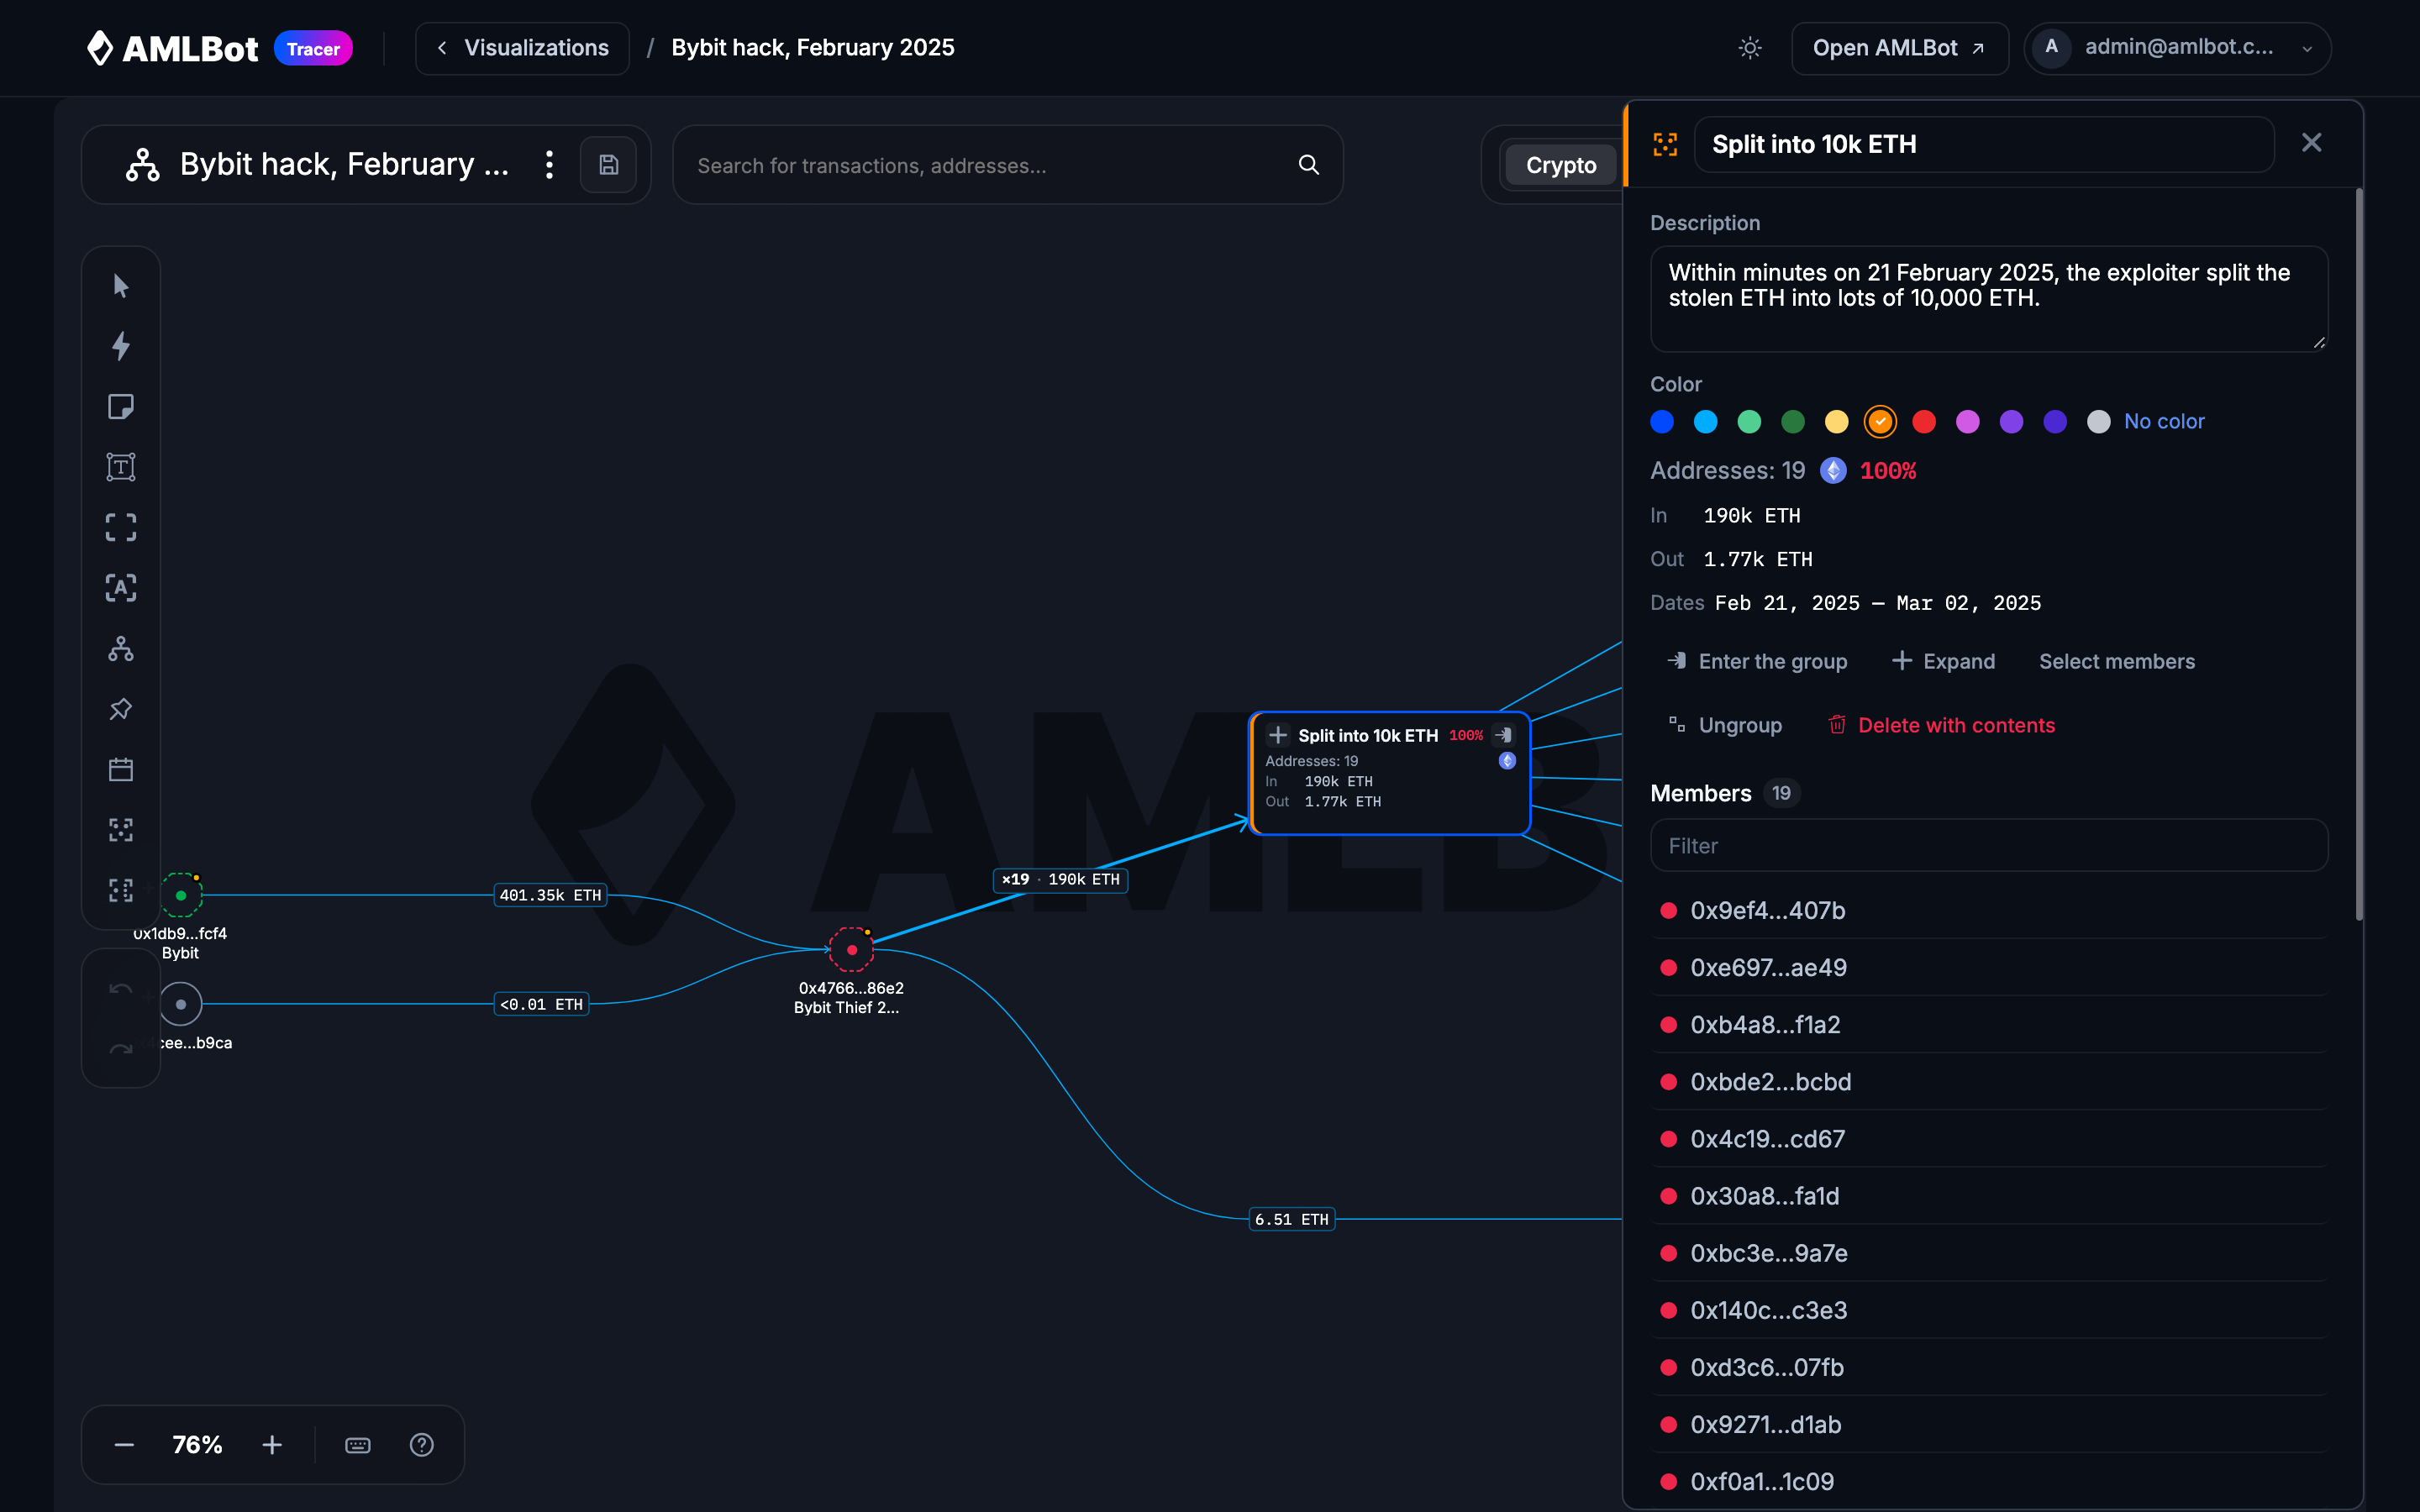
| Part | What it does |
|---|---|
| Title | Click to rename. Enter or clicking away saves. A double-click on the frame’s title renames it in place too. |
| Description | Free text, saved when you click away or press ⌘Enter / Ctrl+Enter. |
| Color | Colours the block and the frame header. No color removes it. |
| Facts | Addresses, entities, chains, highest risk, In and Out totals, and the Dates of the first and last transaction crossing the group’s boundary. |
| Enter the group, Collapse / Expand, Select members | Navigation. Select members selects what the group holds on screen. |
| Tidy, Ungroup, Delete with contents | See below. |
| Members | Sub-groups first, then the objects. Click one to show and select it. |
| Counterparties | The outside parties, with their totals in and out, as the ports show them. Click one to show it. |
Hovering a block for half a second shows the same summary as a card, without opening anything: the title, the description, the counts, every asset’s totals, the dates and the highest risk. It does not appear on touch screens.
Moving objects in and out
- Drag objects or blocks onto a frame or a block. The group they would join is highlighted while you drag; drop, and they join it where you dropped them.
- Move to group… in the right-click menu opens a list of the graph’s groups, with a filter and Top level. Objects already inside the target’s area keep their place; the others are placed in a column beside its contents.
- Move out of group in the right-click menu moves the selection to the level above, where it is.
A frame grows with whatever is dragged inside it, so dragging cannot take an object out of its own group; use Move out of group. Inside a group, an object moved out leaves the view and comes back as a port if it is connected.
Ungroup or delete
Ungroup removes the group and keeps everything it held. Delete with contents, in the group panel, removes the group, every group and object inside it, and whatever outside is left with nothing to connect to: a transaction whose other end was inside, a comment attached only to an object inside. It asks first, and says how many groups, objects and transactions will go. Undo brings them all back.
Layout
Auto layout in the tool strip lays out the level you are looking at, and keeps each expanded group’s contents together. Tidy, on a frame’s header or in the group panel, lays out one expanded group’s contents and leaves the rest of the graph alone.
Frames are drawn around wherever their objects are, so two frames can overlap after objects are moved by hand. Run Auto layout to separate them.
Export
- Export as PNG captures the level you are looking at: inside a group, the group with its ports.
- Export all Addresses to CSV and Export all Tx hashes to CSV end with a
groupcolumn: the titles of the groups an object is in, outermost first, asOuter / Inner. A transaction gets the innermost group that holds all of its ends, so one between a group and the rest of the graph has none.
Undo
Every change to a group (creating, renaming, collapsing, moving objects in or out, deleting) is one step of Undo. Entering and leaving a group, and opening the panels, are not changes and are not undone.
Suggest groups
Suggest groups in the tool strip looks at the level you are on and proposes groups. Everything is worked out from the graph on screen; nothing is sent anywhere.
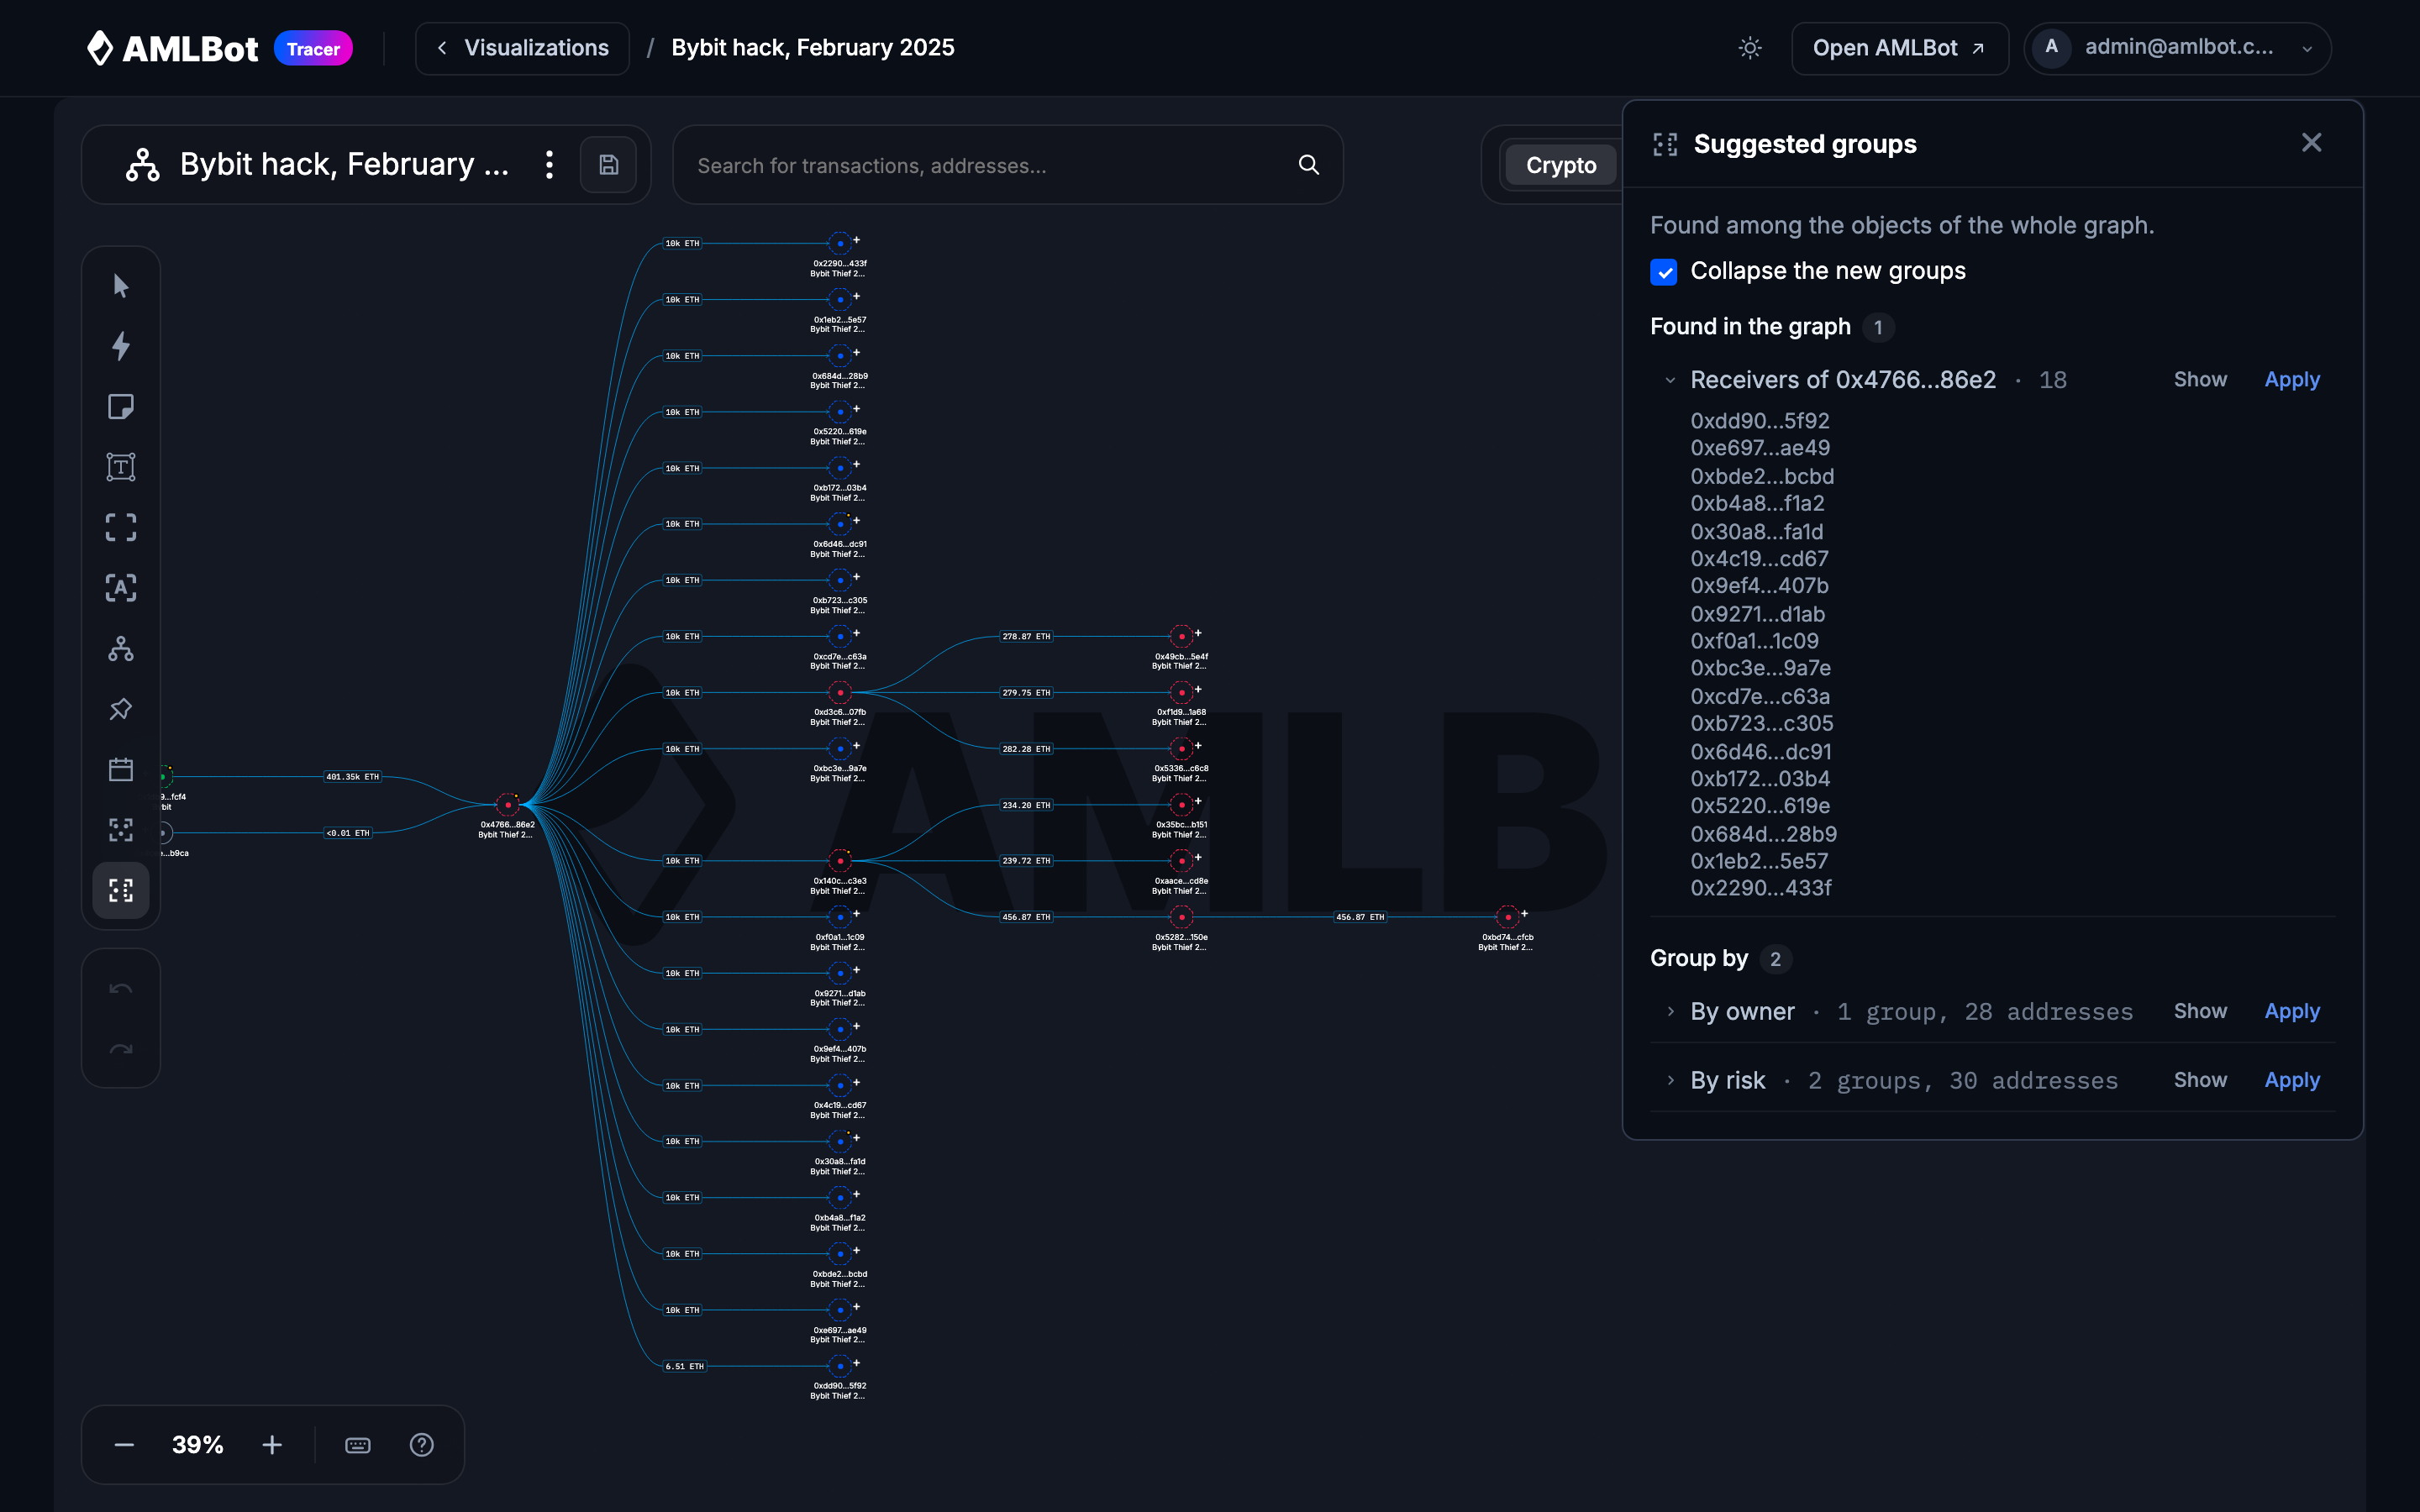
Found in the graph lists the shapes that usually mean something in a trace:
| Row | What it finds |
|---|---|
| Ladder A → B | Three or more objects that each received only from A and sent only to B: funds fanned out through intermediaries and gathered again. |
| Senders of X / Receivers of X | Four or more objects whose only counterparty is X, all in the same direction: the leaves around a hub. |
| Chain first → last | Three or more objects in a row, each receiving once and sending once: a layering or peel chain. |
Group by splits the level into several groups at once:
- By owner: the owner Tracer knows for the address;
- By label: your labels;
- By risk: High risk, Medium risk, Low risk and Unknown risk, from the score the address shows;
- By chain: one group per blockchain, for example the two sides of a bridge.
Only keys shared by at least two objects make a group, and a suggestion never takes every object on the level.
For each row:
- Show selects what it would group and brings it into view. Nothing changes on the graph.
- Apply creates the group, titled as the row reads; a Group by row creates one group per key, titled by the key. Collapse the new groups is on by default; clear it to get them expanded. Applying is one step of Undo, and the list is worked out again straight away.
Expand a row to see what it holds: its objects, or the groups a Group by row would make.
Suggestions only look at the level you are on, and treat a group inside it as a single party. Enter a group to get suggestions for what is inside it.
Read-only views
On a shared link, groups can still be collapsed, expanded and entered, for you alone: nothing is saved. Clicking a block opens the group panel without its editing controls; Enter the group, Collapse / Expand and Select members remain. Creating, changing and deleting groups, moving objects, and Suggest groups are not available.
History
The History bookmark records each change to a group: Created group, Updated group (a new title, description or colour, objects moved in or out) and Removed group, with the group’s current title while it still exists. Collapsing, expanding, entering, moving a block and Tidy are not recorded.
Shortcuts
| Keys | Action |
|---|---|
| ⌘G / Ctrl+G | Group the selection |
| ⌘⇧G / Ctrl+Shift+G | Ungroup |
| Enter | Enter the selected block’s group |
| Escape | Go up one level |
| ⌫ / Del | On a block: ungroup, keeping the contents |
Limits
- A title is at most 80 characters, a description at most 1000.
- A link to a visualization always opens the whole graph, not the group you were in.